How to Replace Galvanized Pipes Easily and Effectively?
Replacing Galvanized Pipes can seem overwhelming. Yet, with the right approach, it is manageable. Many homeowners face issues with aging galvanized pipes. These pipes often corrode over time, leading to leaks and reduced water quality. Understanding how to replace them is crucial.
When replacing galvanized pipes, experience is invaluable. Knowing the right tools and techniques can save time and frustration. Many DIY enthusiasts encounter challenges. They might not know which materials to use or how to ensure proper connections. Reliable guidance can help navigate these pitfalls.
It’s essential to prepare adequately for the task. Gather all necessary tools and components beforehand. Have a clear plan, but expect some unexpected challenges. Engaging a professional may be wise if the project becomes too complex. After all, safety and effective results should be the priority when tackling the process of replacing galvanized pipes.
Understanding Galvanized Pipes and Their Limitations
Galvanized pipes were once a popular choice for plumbing systems. They consist of steel pipes coated with zinc to prevent rust. Over time, the zinc erodes, leading to rust and corrosion. This can affect water quality and flow. Homeowners may not realize the impact until noticeable rust appears or water pressure drops.
Understanding the limitations of galvanized pipes is crucial. They can cause health issues due to lead contamination. The build-up of mineral deposits often restricts water movement. This deterioration can lead to leaks and costly repairs. Replacing these pipes may seem daunting, but it often becomes necessary to ensure safe and reliable water delivery.
When planning a replacement, consider the materials available, such as copper or PEX. Each option has its pros and cons. Some might find PEX easier to install due to its flexibility. Yet, others may prefer the durability of copper. Analyzing these factors is essential for a successful pipe replacement project. A thoughtful approach can lead to a more effective plumbing system.
Essential Tools and Materials for Pipe Replacement
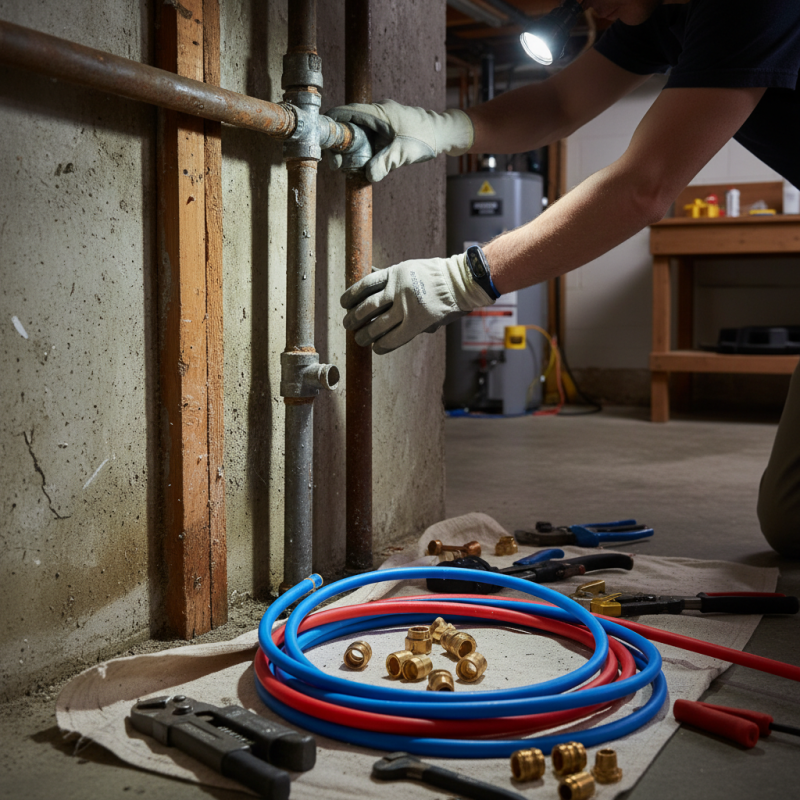
Replacing galvanized pipes can be a straightforward task if equipped with the right tools and materials. Essential tools include a pipe wrench, a hacksaw, and a pipe cutter. The pipe wrench ensures a solid grip on galvanized pipes, which are often corroded. A hacksaw or pipe cutter allows for clean cuts, minimizing damage to surrounding areas. According to industry reports, using proper tools can reduce the time spent on such projects by up to 30%.
Material selection plays a crucial role. Copper or PEX piping is often recommended as replacements due to their durability and resistance to corrosion. The average lifespan of PEX is around 50 years, significantly longer than galvanized pipes that may last 20 to 50 years depending on the water quality. Always use high-quality fittings and sealants to avoid leaks. Industry statistics indicate that improper installation can lead to a 15% increase in maintenance costs.
Practicing caution is necessary when replacing pipes. Even experienced DIYers encounter issues like uneven cuts or misaligned fittings. These mistakes can result in water damage or the need for rework. A careful approach, combined with reliable tools and materials, makes the process smoother. Prioritizing quality over speed often leads to better long-term results in pipe replacement.
How to Replace Galvanized Pipes Easily and Effectively? - Essential Tools and Materials for Pipe Replacement
| Item | Description | Quantity Needed | Estimated Cost ($) |
| Pipe Cutter | Used to cut through galvanized pipes | 1 | 25 |
| Pipe Wrench | Essential for loosening and tightening pipe fittings | 1 | 20 |
| Replacement Pipes | New pipes to replace old galvanized ones | 5 | 100 |
| Thread Seal Tape | Used to seal threaded pipe connections | 1 | 5 |
| Safety Goggles | Protective eyewear to guard against debris | 1 | 10 |
| Gloves | Work gloves for protection during installation | 1 pair | 15 |
| Joint Compound | Sealant for ensuring leak-free connections | 1 tube | 5 |
Step-by-Step Process to Remove Old Galvanized Pipes
Removing old galvanized pipes can seem daunting, but with the right approach, it becomes manageable. Start by turning off the water supply. Then, drain the pipes to avoid any surprises. Use a pipe wrench to loosen fittings, being careful not to damage adjoining pipes. Inspect them regularly during the process to determine if they need replacement too. Old pipes may have corrosion, making them tricky to handle.
Next, utilize a reciprocating saw to cut the pipes into manageable sections. This simplifies removal. Wear safety goggles—debris can fly. Be aware that galvanized pipes can be heavier than they look. Keep the work area tidy; clutter can lead to accidents. It’s important to have a strategy for disposing of the old pipes, as some waste management facilities have specific guidelines.
Lastly, if the process feels overwhelming, consider seeking help from a professional. They can provide insight and ensure the job meets local codes. You might realize that while the task can be tedious, the results are worth it. This replacement can lead to improved water flow and quality, making your efforts feel rewarding. Take your time, and be prepared for unexpected challenges along the way.
How to Replace Galvanized Pipes Easily and Effectively?
Installing New Pipes: Choosing the Right Material
When replacing galvanized pipes, choosing the right material is crucial for long-lasting performance. Copper, PVC, and PEX are popular options, each with unique benefits. Copper is durable and resistant to corrosion. PVC is lightweight and easy to install, while PEX offers flexibility and simplicity in tight spaces.
Tips: Consider your local climate when choosing materials. Copper may not be ideal in areas exposed to extreme temperatures. PEX can expand in freezing conditions, making it suitable for various climates. Always consult local building codes before making any decisions.
Installation should be approached thoughtfully. Each material requires different tools and techniques. For instance, soldering copper requires specific skills and safety measures. PVC needs careful cutting, and PEX requires crimping tools. If unsure, hiring a professional can save time and reduce costly mistakes.
Tips: Research the benefits and drawbacks of each material to make informed choices. There are common misconceptions about PVC not being suitable for hot water. This is not true; it works well when properly rated. Reflect on your project’s requirements and plan accordingly.
Finalizing the Installation: Checking for Leaks and Testing
Finalizing the installation of galvanized pipe replacements involves crucial steps to ensure a leak-free system. After connection, inspect the joints and fittings meticulously. A reported 20% of plumbing leaks arise from poor installation practices. Checking for leaks saves money on water bills and prevents structural damages.
Use a simple method to test for leaks: turn on the water supply gradually while observing connections. Look for wet spots or damp areas. If leaks are detected, revisit the fittings and tighten as necessary. Ensuring proper alignment and securing joints can reduce the chances of leaks significantly.
Testing also involves running the water for some time. Check not just for leaks but also for consistent water pressure. A sudden drop can indicate other issues, like blockages. Consider the environmental impact; wasted water can harm natural resources. Keeping an eye on these details ensures your installation remains reliable and efficient over time.